
I’m mixing directions from several different websites, but I have tried clearing it up as much as possible. Enjoy!
Adding Social Media Buttons to Your Website via HTML Code


![]()
Although some WordPress.com (and other website-building site) themes have a way to automatically customize social media, quite a few actually don’t. For my WordPress website, I used to just add the “Image” widget and link to my other accounts. But since you can’t line them up horizontally, that ended up with a long line of pictures down my sidebar. So instead, I mixed directions from different websites, played around, and came up with the following instructions for adding a horizontal row of Social Media icons linked to your accounts.
********************************
![]()
The first thing you need are the Social Media icons you want to use. This just requires that you search the internet to find a set of icons/images that you like. Save them to your computer.
I particularly like the icons offered by Jennifer Bourn on her website “Bourn Creative.” She offers all different styles, sizes, and colors. If you like hers, you just pick the style (Circles, Squares, Scalloped Edges, etc.) you like and download her zip file. This file will contain all the different colors she offers. Once you have downloaded the zip file, go up and extract all files within the folder. Make sure you know how to find that file on your computer (usually it has downloaded to “Downloads” if you go to “My Computer”).

![]()
Second, you have to upload your chosen icons to the website’s WordPress Media File. If you haven’t ever done this before, don’t worry; it’s simple.
- Go to the WordPress Dashboard.
- Under the Media Tab, choose “Add New”

- This is going to take you to the standard “Upload Image” screen; I’m presuming you already know how to upload pictures (click “Choose File(s)” –> Pick your image –> “Okay). It may try to have you upload them one at a time, which is tedious. To avoid that, choose the “multi-file uploader link on the screen)

- Upload the image for each social media account you want to add. You’re done with the Media tab for now, but leave it open because you’ll need this in a minute.
![]()
- Now open your WP Dashboard on a new page. Go to your “Appearance Tab” and pick “Widgets”
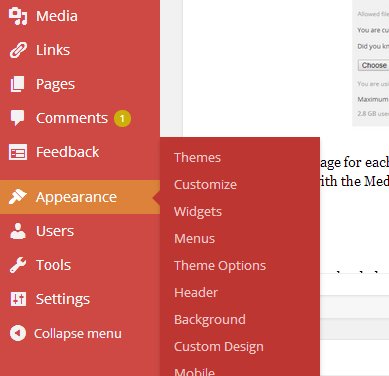
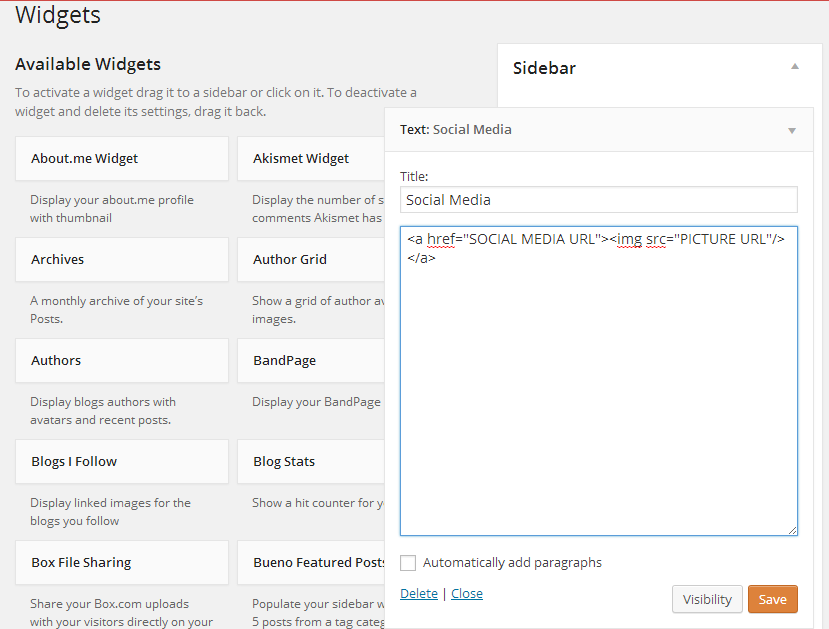
- Drag the “Text” widget onto your Sidebar. This will allow you to import the HTML Code.
- Copy and Past the following HTML Code into the Widget:
![]()
- Within the code, you will need to replace two things:
- “SOCIAL MEDIA URL” = the hyperlink for your social media account (i.e. for Twitter -> https://twitter.com/deceptiveblonde). Basically, go to each website and copy the url for your homepage; replace the “SOCIAL MEDIA URL” with that url.
<a href=”https://twitter.com/deceptiveblonde“><img src=”PICTURE URL”/>
- “PICTURE URL” = the hyperlink for the image in your media file.
- Go back to the Tab with your Media File where you uploaded all the images. Open the image for the account you are working on.
- On the Right side, you will see “File URL.” Copy that hyperlink. (I.e. the hyperlink for my Twitter icon was https://deceptivelyblonde.com/wp-content/uploads/2014/05/125×125-scallopedcircle-94-tw.png

- Go back to your widget and replace “PICTURE URL” with that File URL.
<a href=”https://twitter.com/deceptiveblonde“><img src=”https://deceptivelyblonde.com/wp-content/uploads/2014/05/125×125-scallopedcircle-94-tw.png“/></a>
![]()
- You have officially completed one Social Media Icon. Check out your Website and bask in your accomplishment!
- If you want multiple icons (which most people do), you just have to repeat that process for each icon. The only difference is that instead of making a new widget for each one, you just keep repeating the code in the same box. I have added Facebook, Twitter, Pinterest, Youtube, RSS Feed, and Google+ icons to mine. The finished HTML Code looks like this:
![]()
RE-SIZING IMAGES
There may be a small problem with the size of your images. The file from Bourn Creations downloads all images as 125 x 125 (or at least the ones I played with did). Supposedly there are a bunch of different sizes, but all of them I looked at were the same size. Since this was bigger than I wanted, that meant I needed to re-size the images.
- Re-Open the image on your Media File Tab.

- Underneath the Picture, click “Edit Image”

- Where it says “Scale Image” enter in the dimensions you want. I used 48 x 48. When you are done, select the “Scale” button.
 Now click ‘Update” on the far right.


- Go back through the process in Part 4 of the instructions where you replace “PICTURE URL” with the new FILE URL.
- You’re Finished!


Great info. Lucky me I found your site by chance (stumbleupon).
I’ve book-marked it for later!