Archive | Wordpress RSS feed for this section

Adding Colored Text to Select Words or Lists on WordPress Block Editor

23 Nov

One of my greatest frustrations with WordPress’ is the fact that adding colored text to bullet pointed lists has disappeared as an option in the toolbar. It also no longer allows you to add color to only select text in a paragraph.

  • Harbin, China holds one of the largest Ice Festivals annually.
  • Shanghai, China is home to Yuyuan Gardens
  • Tianjin, China offers some of the best Hot Baozi

You’ll notice if you used the Block Editor to type the above list that you can make only the simplest textual changes (Bold, Italics).

Continue reading

Installing #WordPress Site on #HostGator

21 Apr

How to Install and Start Editing your WordPress Site on Hostgator!!

STEP #1 – Sign Into your CONTROL PANEL.  If you aren’t sure how, look here.

WP 1

See the button in the picture above that says “WordPress – 1 Click Installation?”  Click it 🙂

WP 2

Click the down arrow and choose the domain name (URL: http://www.deceptivelyblonde.com) that you have created on HostGator and was to set up as a WordPress Site. Click “Next”

WP 3

Fill in your Name and information for the WordPress Site.  Be careful – if the email address you use already has a WordPress Site attached to it, they’ll want to add this site to your old WordPress account. If you don’t want to do that, you’ll have to create a new WordPress account.

WP 4

You’re installing!  Wait, Wait, Wait!

WP 5

Awesome! Your Installation is Complete.  Pay attention to the “Installed to:” “Username” and “Password” — You’ll need these next.

Take that “Installed To:” URL and put it in your URL field at the top of your browser. It should be the url you chose for your website.  Basically, just go visit your new site. It’ll show the image below:

For example: “https://www.deceptivelyblonde.com”

wP 6

This is the page that everyone else is going to see until you finally publish your completed site.  But for now, just click “Admin Login.”  In the picture below, enter the username and password that they gave you before.    

WP 7

Viola!  You’ll be on the familiar “WordPress” dashboard instead of the Hostgator dashboard.  Now you can go through the steps and start setting up your website.  (I’ll post another instruction set for that later. 🙂

WP 8

#HostGator – Payment Verification Process

4 Apr

Hostgator is a little serious about protecting your privacy. So you have three ways to purchase your package — Credit Card, E-Card, or Paypal.

 If you use a Credit Card or E-Credit Card, you may have to do verification of your identity.  If you don’t do this within 48 hours, they will cancel your purchase.  I had to submit a copy of my driver’s license and a picture of my credit card.  For the Credit Card, they asked me to hide the first 12 numbers of my card. I also went ahead and blacked out the DOB, Middle Name, and some other private details on my Driver’s License.  

Verification

*To hide information on a photo – 1) Save the image on your computer. 2) Right Click on the photo and choose “Edit.”  It should open the photo up in a program where you can draw on it.  3) Use a big brush or something to draw lines through the information you want hidden. 4) Save the picture. 

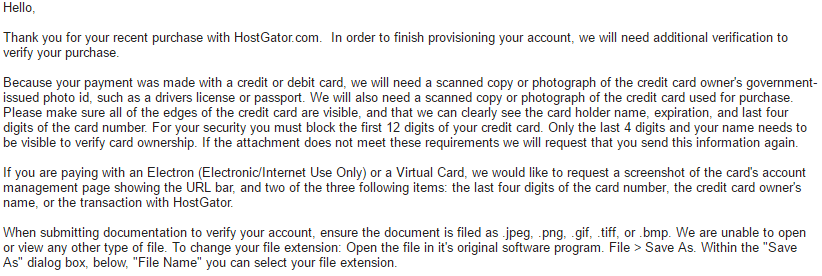
If you have to do this verification process, they’ll send you an email asking you to do the requirement. They’ll tell you what to send, but not WHERE.  

Go to your Billing Account (your password will have been in an email with the subject ‘billing’ along with a link to your Billing Account).

Look on the top bar for “SUPPORT.”

Verification 2


Once there, go to “TICKET HISTORY.”  You’ll see a support ticket is already open with the subject “Hostgator – Verification Requested.”  

Verification 3

Click on the Ticket ID#.

It’ll open up a page where you see basically the same message as was in your email.  But at the bottom of the page you can “Reply” with a message and attach your documents.

Verification 4

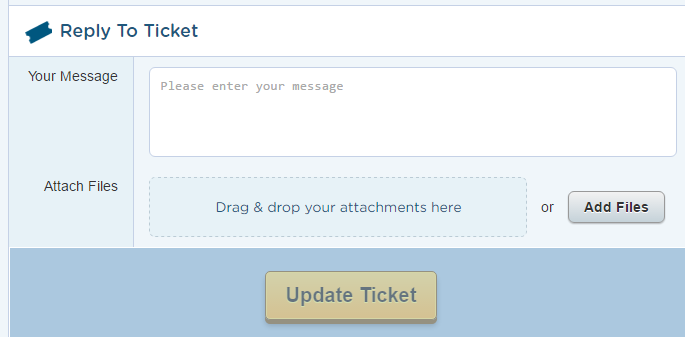
Once you add your files, click “UPDATE TICKET”

Then you just have to wait for them to verify everything. 

Typing Single-Spaced on WordPress

16 Feb

Ever have that frustration where you want to enter something into your WordPress Post single-spaced, but WP keeps changing it to double spaced? Single-Spacing on WordPress is necessary sometimes! For example, entering an address:

Mr. Hades & Co.

000 Styx Street

Halloween Town, End of Nowhere 66666

See what I mean? The default when typing in WordPress is for the computer to add a line every time you hit “Enter.”

Its annoying, especially with things like poetry, literature, quotes, addresses, etc.

So how do you type in Single Space without a space between each line? There are two ways

Easy !

Just hit the “Shift” key when you hit “enter.”

Yep, usually, we just type “Enter” when we want to go down a line. But that will give you an extra space. So instead hit the “enter” button while holding down “Shift.”

Mr Hades and Co.
000 Styx Street
Halloween Town, End of Nowhere 66666


Happy Posting!


Things I Hate about the new “New Post” and “New Stats” Pages on WordPress

16 Mar

I’m usually pretty excited about new updates to technology.  New website versions up and running? I’m willing to give them a chance.  Of course, Facebook is driving me nuts (especially with the Messenger updates), but I’m typically happy with the new options most programs offer when advancing further into new designs and offerings.

WordPress has been one of those websites I really, really love.  I love the simplicity, I love how I almost instantly figure out what I need to do to accomplish my websites’ goals.  I love that it looks nice, and that my websites reflect that.  I love that it stays up-to-date.

But I’m really, REALLY not enjoying the new “New Post” and “New States” pages they are unveiling.  It’s much worse than the old pages for a variety of reasons.  Most of these issues are things I’ve lost with the new layout – maybe I’m missing something, but if so then so are a lot of other people. I always liked how easy it was to find things, and now I feel like a lot of stuff is just gone.  For example: Continue reading

Adding Paypal Button to WordPress.com Widget

28 Oct

Now that I have 5+ blogs and 3 website going, keeping everything is starting to take more time and money to cover website maintenance.  I decided to add a Paypal “Donate” button to a couple of the social blogs for those people gracious enough to volunteer to help out.

Unfortunately, the process of adding a “Donate” button was rather more confusing than I expected it to be.  I assumed that you simply created the button on Paypal and then copied the code, but it took a few more steps.

There is a WordPress.com page dedicated to the subject, but it mostly works from the focus of adding the button to a post or page.  Not as a widget.  This one from me is dedicated to the Widgets 🙂

~~~~~~~~~~~~~

1.  Go to your WordPress blog and open up “Widgets.”

2. Click and Drag an “Image” Widget onto your Sidebar.

3. Give it whatever Widget title you want ~ e.g. Help Keep the Site Going ❤ Continue reading

Adding Social Media Buttons to Your WordPress.com Website

14 May

I’m mixing directions from several different websites, but I have tried clearing it up as much as possible.  Enjoy!

Adding Social Media Buttons to Your Website via HTML Code


Divider

Although some WordPress.com (and other website-building site) themes have a way to automatically customize social media, quite a few actually don’t.  For my WordPress website, I used to just add the “Image” widget and link to my other accounts. But since you can’t line them up horizontally, that ended up with a long line of pictures down my sidebar.  So instead, I mixed directions from different websites, played around, and came up with the following instructions for adding a horizontal row of Social Media icons linked to your accounts.  

******************************** Continue reading

%d bloggers like this: