Archive | Hostgator RSS feed for this section

Installing #WordPress Site on #HostGator

21 Apr

How to Install and Start Editing your WordPress Site on Hostgator!!

STEP #1 – Sign Into your CONTROL PANEL.  If you aren’t sure how, look here.

WP 1

See the button in the picture above that says “WordPress – 1 Click Installation?”  Click it 🙂

WP 2

Click the down arrow and choose the domain name (URL: http://www.deceptivelyblonde.com) that you have created on HostGator and was to set up as a WordPress Site. Click “Next”

WP 3

Fill in your Name and information for the WordPress Site.  Be careful – if the email address you use already has a WordPress Site attached to it, they’ll want to add this site to your old WordPress account. If you don’t want to do that, you’ll have to create a new WordPress account.

WP 4

You’re installing!  Wait, Wait, Wait!

WP 5

Awesome! Your Installation is Complete.  Pay attention to the “Installed to:” “Username” and “Password” — You’ll need these next.

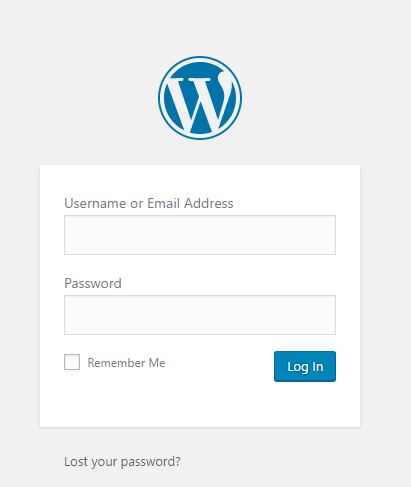
Take that “Installed To:” URL and put it in your URL field at the top of your browser. It should be the url you chose for your website.  Basically, just go visit your new site. It’ll show the image below:

For example: “https://www.deceptivelyblonde.com”

wP 6

This is the page that everyone else is going to see until you finally publish your completed site.  But for now, just click “Admin Login.”  In the picture below, enter the username and password that they gave you before.    

WP 7

Viola!  You’ll be on the familiar “WordPress” dashboard instead of the Hostgator dashboard.  Now you can go through the steps and start setting up your website.  (I’ll post another instruction set for that later. 🙂

WP 8

#Hostgator – Changing Your Control Panel Password

11 Apr

Changing Password.png

To change the password, sign into your Control Panel.  On the top right, you’ll see your username. Click it.

The drop-down will say “Password & Security”

Now just enter your old password and your new one. 🙂

#HostGator – Payment Verification Process

4 Apr

Hostgator is a little serious about protecting your privacy. So you have three ways to purchase your package — Credit Card, E-Card, or Paypal.

 If you use a Credit Card or E-Credit Card, you may have to do verification of your identity.  If you don’t do this within 48 hours, they will cancel your purchase.  I had to submit a copy of my driver’s license and a picture of my credit card.  For the Credit Card, they asked me to hide the first 12 numbers of my card. I also went ahead and blacked out the DOB, Middle Name, and some other private details on my Driver’s License.  

Verification

*To hide information on a photo – 1) Save the image on your computer. 2) Right Click on the photo and choose “Edit.”  It should open the photo up in a program where you can draw on it.  3) Use a big brush or something to draw lines through the information you want hidden. 4) Save the picture. 

If you have to do this verification process, they’ll send you an email asking you to do the requirement. They’ll tell you what to send, but not WHERE.  

Go to your Billing Account (your password will have been in an email with the subject ‘billing’ along with a link to your Billing Account).

Look on the top bar for “SUPPORT.”

Verification 2


Once there, go to “TICKET HISTORY.”  You’ll see a support ticket is already open with the subject “Hostgator – Verification Requested.”  

Verification 3

Click on the Ticket ID#.

It’ll open up a page where you see basically the same message as was in your email.  But at the bottom of the page you can “Reply” with a message and attach your documents.

Verification 4

Once you add your files, click “UPDATE TICKET”

Then you just have to wait for them to verify everything. 

Setting up HostGator Website (Part 1)

4 Apr

BUYING YOUR HOSTING SERVICE:

You can get a discount on your service if you purchase HostGator with the PCMAG discount code via this link.  The basic service (I did a Hatchling program) is around $3-5 per month with the discount and depending on how many months you purchase.

Additional Costs & Available Services:

  • Domain Name (prices vary based on what ending you want – .com, .org, .net, .me)
  • Domain Privacy Protection Service at $1.08/month.
  • Protect Your Site from hackers at $19.99/year
  • Professional Email (if you want one – I don’t) at $5/month
  • Back-up your work daily at $19.95/year

PAYMENT & CARD VERIFICATION

Hostgator is a little serious about protecting your privacy. So you have three ways to purchase your package — Credit Card, E-Card, or Paypal.  For the cards, your billing address and phone number must be the same as you have on your Card Statement each month.  

You may be asked to verify your card or payment information afterwards. You must do this in 48 hours.  For information on how to do that click here.

YOUR ACCOUNTS

On HostGator, you have two websites you’ll be operating with.  As soon as you finish your purchase, you’re going to get two different emails from them.  

  1. The first should have the Subject ‘Billing.’  That’s your Billing Account information.  This email should give you a link to the Billing Account, your Login Name / Email Address, and a Password.
  2. The second should have the Subject “Your Account Info.’  That’s the information for accessing your new Control Panel for your Website!  It will also tell you the link to the CP, your Login Name, the Password, your server and some other details.  

KEEP BOTH OF THESE EMAILS!

I recommend logging into both websites and changing your password to something more memorable.  But you won’t be able to do anything with the billing account until verification is completed. 

%d bloggers like this: