Archive | Tips RSS feed for this section

How to Find Your Wireless Password without the Router

27 Nov

I ran into this problem today, so I figured I would share the information with you 🙂

If you need to find the wireless password and you don’t have access to the Router (I.e. you are at an extended family’s house like me  :P) Here is how you go about locating that.  

  1. Enter 192.168.1.1 into the URL box in your browser. That’s it. No www or http://.  Just those numbers.
  2. It’s going to ask you for a username and password.  Usually that’s admin and admin for both username and password.  Sometimes it’ll be something like admin and password.  It always works with just admin for me.
  3. Now it should bring up a page with all of your internet’s information- name, router information, etc.  Somewhere there will be a place for Internet Security (or something similar). That is going to have your password!
  4. Mostly, just fiddle around with the page it pulls up, looking at the different tabs and options, until you find security with the password’s information.

Worked for me; hope it helps you!!


SD Memory Card Locked

12 Nov

I’ve run into this problem several times with photographers (particularly amateur with the little cameras), although I’m sure other people have had the same problem.  You plug in your SD Memory Card and it says something like “Memory Card Locked” or “Memory Card Unavailable.”  Don’t freak–your card isn’t necessarily unrecoverable!

If you look at the picture of the card above, note the notch on the left side. If you look carefully, you’ll see a part that’s a light grey.  You can see it more clearly in this picture.

What you may not know is that this is a little button–it slides up and down. And it is what locks up a memory card.  Basically it’s a key that protects your information from being hurt, so it locks the information down. You cannot access it, and you cannot change it.  Unfortunately, this is going to bring up error messages when you plug the card in. This is especially an issue for photographers who frequently pull the cards in and out of the camera. A lot of times, you’ll accidentally trigger this little button without realizing 

All You Have To Do Is Re-Click The Button.  

That’s it. Real Simple, no hassle, no computer-wizards necessary.  🙂

Testing Out AirBnB . . . RESULTS!

5 Aug

I have recently been uploading/updating a rather long-winded post outlining my experiences with the website AirBnB.  While it took almost 4+ months, and lots of emailing back and forth, at last I can bring you my results!  

I ended up choosing a room hosted by a man named Jinwoo.  You can see the link that he had posted on AirBnB here.  My requirements were pretty simple:

A cheap room for 18 days in the middle of Seoul in a safe neighborhood that had free internet,a Lock on the door with a Key I could keep on hand.  Since I couldn’t pay upfront, I also needed to put down a deposit instead.

You can read from my other post most of the process I went through, but to sum it up:

  • I emailed him on AirBnB about the room with the information above and asking for price and room availability verification.
  • Since I had special issues regarding the deposit, He responded with a request that I speak with him via Kakao (the Korean version of Messenger).
  • He was incredibly kind to me and we sent back and forth about 4 messages setting up how I was to pay the deposit ($100) and getting all the details.
  • I finally got the address and he also attached directions on how to get there. So I set off!

And now, the RESULTS!

Ease of Locating the Place

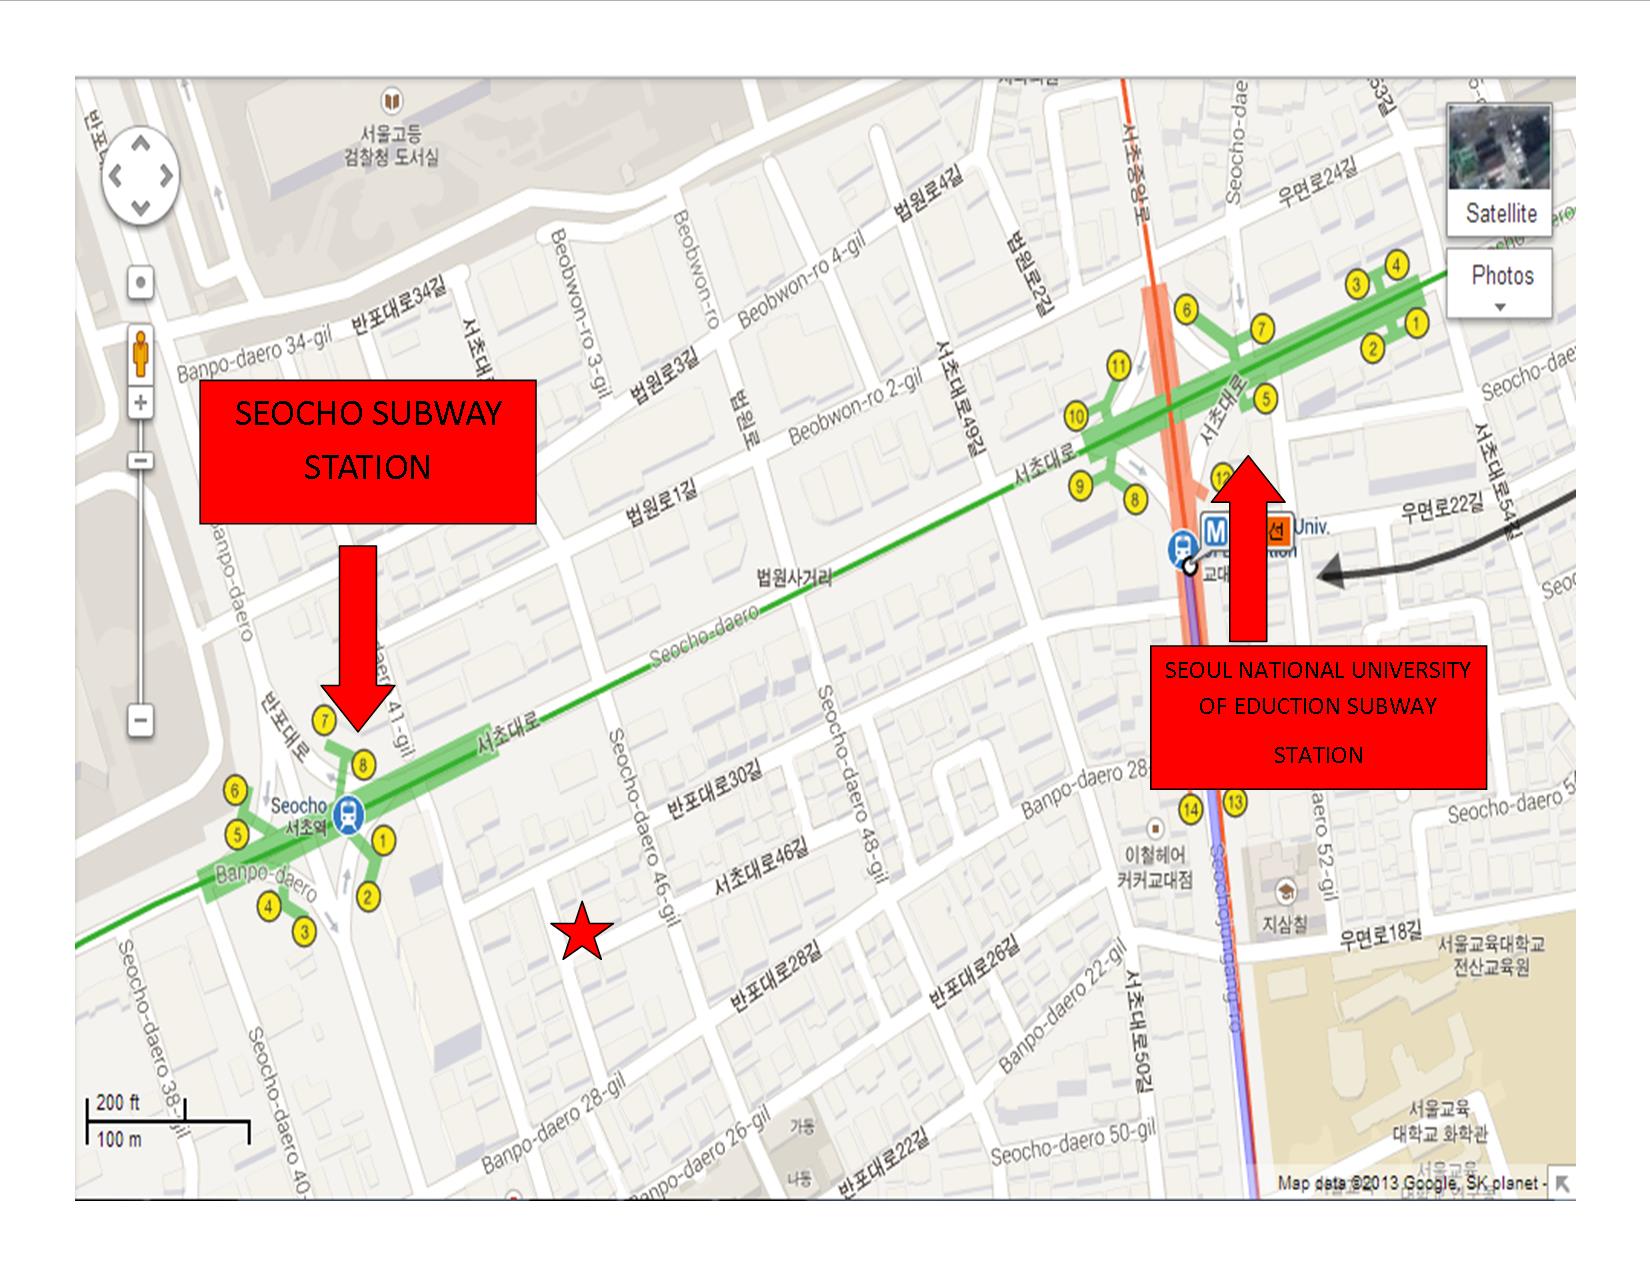
Per the owner’s instruction, upon arrival at Incheon Airport, I grabbed the #6020 Limosuine bus for Seoul (it takes about an hour at ₩15,000 = approx. $15).  It took me to the Seoul Nat’l. University of Education (SNUE) stop (be careful–there is a Seoul Nat’l. University stop, but it isn’t the same one; look for the Education part of the title).  This was the intersection where the SNUE Subway Station was located. It’s too close to take a taxi and the owner recommends  taking the subway up to Seocho Station. However, I was carrying 2 heavy suitcases that didn’t make it feasible to go up and down the subway stairs so instead I hiked it. I was glad to discover that from Exit 9 of the SNUE subway station (you can see the numbers from the sidewalk above and each has a map posted at the top of the stairs), it was only about a 2-3 block straight walk to Seocho Station’s Exit #1.  From there I was told to take the first right then the first left and look for a kimchi shop. I’ve marked the location on the map below with a star so you can see it’s exact location. It only took about 2 minutes from the subway station. It took me a long time because I had to figure out how to get to Seocho Station from where the bus dropped me off and the walk was uphill; plus I wasn’t sure which Kimchi shop. But overall, it was really easy to find.

Map

GOOD LOCATION?

This slideshow requires JavaScript.

The “Gangnam” title is a little bit of a misnomer since it’s actually about 3 subway stops away from Gangnam Station; however I didn’t find that to be a detraction.  The hotel was 2 minutes away from a subway station (amazing location for Seoul–the subway is your lifeline), which was on a busy intersection where tons of taxis pass by. If you couldn’t get to your location via subway, there was always a taxi.  There’s nothing there for tourists, but it’s right beside the Prosecutor’s office, the Supreme Court, and a bunch of other legal facilities so it’s definitely in a safe location.  This part of town is also close to a major college, so there are several coffee shops on the main road and some local restaurants across the street and next door.  The main road also had a Lotteria and a 24 hour convenience Mart less than a minute (literally maybe 2 buildings) from the subway. There was a bar across the street and the restaurant downstairs served alcohol so people could sometimes get pretty loud, but closing the window fixed that.  One nice thing was that you always used Seocho Station as your taxi’s address (they knew where it was just by me saying Seocho Yok (station)) and you only had a minute’s walk so you didn’t have to carry the address around and it was easy to locate 🙂 .  All in all, I liked the location.

Room Itself

This slideshow requires JavaScript.

At last we come to the room itself.  The room was incredibly small (barely walking room, maybe the size of my bathroom back home) and included:

  • A Twin Bed with a blanket, sheet, and pillow. The bed was fine, but I wish I’d gotten a replacement sheet/blanket. The pillow was pretty flat too, so I might have been better off bringing my own.
  • A desk. The desk was awesome; it was the length of the room and left me plenty of room to stash my laptop, camera, and other school-related supplies.  It also came with an ethernet cord in addition to the wifi (although wifi was kind of sketchy some nights).  It had plenty of outlets which was really nice.
  • A Closet. The closet had a couple of hangers and was pretty small, but I made do.  Mostly I just stashed my suitcases in there to keep them out of the way.
  • A mini-Fridge. I loved the mini-fridge. There was a refrigerator in the kitchen, but I liked to keep drinks and snacks here.  Saved me from moving in the heat unless I had too and I kept my drinks cold.
  • 2 windows. Some rooms apparently didn’t have as many windows, but they all had one that opened indoors. I kept the inside one open during the day to get the air-conditioning, but that didn’t always seem to be on at night. Since it was usually coolish and raining at night, I’d open up the outside window then. It really depended on the weather. It could sometimes get cooking in that room, but over time I learned when to stay away in the afternoon’s heat.

It didn’t have bells and whistles, but it was what I had been looking for. A cheap room to myself that came with internet and a lock.  The heat could be a nuisance, and sometimes I got claustrophobic, but overall it was definitely worth the cheap price.

Amenities

So the hotel came with some amenities that I admittedly didn’t take that much advantage of.

  • Since Koreans don’t like to wear shoes indoors, outside the hallway at the top of the stairs there is a row of shoe lockers where you store your shoes.
  • It did have a washer, but drying clothes could sometimes be a problem. However, that seems to be true no matter where you go.  I felt that my clothes always stunk, so I tended to wash them elsewhere when possible.  Plus, the washer was frequently full.
  • There was a kitchen that was pretty nice. It was shared by everyone so the refrigerator was often full, so I used the fridge in my room. It came with rice and kimchi pre-made, but I never really used that. It also had filtered water though and that was a blessing.  It came with a microwave, which is probably what I used the most.
  • The bathroom was probably my least favorite part. On my floor, the bathroom had 2 toilet stalls, each next to a shower stall that it shared a sink with. In one stall on the side was the washer.  It tended to be pretty dirty and was frequently out of toilet paper, but the downstairs toilets were better. My main problem was showering, but that was because I was a girl. Most of the people here were men, and I never felt comfortable showering when I thought a guy could come in and be next door at any time.  Plus it was often full.  Guys would have found it fine I think, and the other girls didn’t seem to mind.  Since I don’t really like the sink-showers anyway, I usually just went to the Dragon Hill Spa in the afternoons. It let me shower and swim for a while, so I enjoyed it.

Conclusion= For $15/per night, it was definitely worth it!

Benefits:

  • The owner was willing to work with me on the deposit instead of upfront issue. He even waited a day while I went and got money exchanged so I could pay him in cash. Great service.
  • The owner was always quick to respond. He usually responded within a couple hours if not sooner. I really appreciated that since I was emailing him from the US mid day making it mid-night in Korea 🙂
  • The room had a lock and key and internet, all of which I needed.
  • The location was amazing in regards to getting around town.
  • The convenience store and Lotteria being so close made dinner and drinks really easy.

Cons:

  • It was hot, sometimes unbearably so. And the air conditioning didn’t always make it through all the rooms .
  • It was small; I didn’t mind too much but it made getting to clothes and things a little difficult.
  • The bathroom situation. The bathroom is really kind of a guys room; it tended to be dirty, stinky, out of supplies and full of guys. Made it awkward for me as a girl, but I made up for that with the spa.  But that cost more, so it was worth taking into consideration.

Want to Try AirBnB Yourself?  Here’s a 25$ coupon!

Testing Out Airbnb. . . A step-by-step analysis updated live

4 Aug

UPDATED!!!

CHECK OUT THE RESULTS ON THE FOLLOWING POST HERE: Testing Out AirBnB. . . the Results!


Seoul, Korea. . . Here I come!

Yes, I am returning to this country of my heart in June, where I get the opportunity to stay for almost 3 weeks.  I will be studying in Kyoto and Tianjin, but I get a little time in between.  After scouring the airline prices, it is definitely cheaper to fly to Korea and hang out there in cheap housing rather than fly back and forth to the US.  Plus, I’m dying to go back!

However, since I am a very cheap student (did I mention I was cheap, as in uber, uber cheap?) I am looking for someplace to stay in Korea for the duration.  Last semester I stayed in Chungmuro, but that hotel is way too expensive to stay in without school loans helping to cover the cost.  On the other hand, I liked being in that area of Seoul, so I think I’ll try finding something in the nearby vicinity of that dip in the Han River.   Continue reading

New Tool on Facebook

9 Apr

New Tool on Facebook–The Smiley-Face!

So, I didn’t really notice this before, but apparently there is yet another new addition to the Facebook experience.   If you look at the box where you insert your status updates (i.e. “I’m totally ready for Spring!”–>My post today :P)  you will notice a new smiley-face button.


fb2


If you click that smiley-face, you will see the options pictured below.  There you can choose from a long list of things including “I’m reading such and such” or “I’m feeling wonderful” to your status.  I’ve seen this option on other journal software programs (DeviantArt, Livejournal), but it is new to FB!  What do you think?  


3

How to Type in Pinyin Chinese on Windows 7

6 Apr

你好!

How to Type in Pinyin Chinese on Windows 7


You can enlarge the images by clicking on them

  • Go to your Windows “Start” button on the task bar at the bottom of your screen.

Windows 7

Adulthood Lesson #1: Maintain a Personal Information Worksheet

5 Apr

To a child, every event, every move seems unforgettable.  And Teens can’t imagine every forgetting the name of that annoying boss at the deli who makes them work on Friday’s date night.  But eventually you grow up and life moves on, taking you with it.  

By the time you’ve gone to college, started a family, worked 5+ jobs, and have a home phone, family phone, cell phone, and skype phone, you’ll start realizing that keeping all that old information separate in your brain gets more and more difficult.  

However, eventually you’re probably going to find that  as you start looking for work, taking important tests, filing taxes, getting licenses, etc. that you will often need on hand a lot of that information from your past.  Some forms may ask you for the name and address of every company you’ve ever worked for (i.e. Certification Exams).  Maybe they need a list of all your home addresses for a background check (Law School).  Maybe you need to have on hand your ex-husband’s SSN# for a government form (i.e. if you’re audited).  

It’s a lot easier to keep track of all that information if you do it as you go along.  So for simplicity’s sake: 

Keep a Record Of All Your Important Work/Personal Info

Maintain an Excel or Word spreadsheet that has all of your important work, education, and personal information.  Keep it up to date; as soon as you marry add the date and county where it was registered into the form.  When you get divorced, go stick the date and presiding county name in your worksheet.  When you start a job add the date; when you quit, add that too.  A good list of things you might need to have on hand includes:

  • Your Personal Information
    • SSN#
    • Passport #
    • Home Addresses (for everywhere you’ve ever lived including dorms).
    • Dates of Residence
    • List of Information relating to any legal trouble you’ve had (including arrests, tickets, citations, etc.)
  • Family’s Personal Information
    • Spouse/Ex
      • Full Name
      • SSN#
      • Date of Birth
      • Date Married/Location of Certificate
      • Date Divorced / Location of Decree
    • Children
      • Full Name
      • SSN#
      • Date of Birth
    • Parents
      • Full Name
      • SSN#
      • Date of Birth
  • Educational Information
    • Name & Address of your High School/ Graduation month and year)
    • Name & Address of any Community Colleges or other such schools/ Dates of Attendance / Graduation Month & Year
    • Name & Address of any Undergraduate Colleges You attended / Dates of Attendance / Graduation Month & Year
    • Name & Address of any Graduate Colleges you Attended / Dates of Attendance / Graduation Month & Year
    • List information relating to any academic problems you’ve had (Probation/Expulsion/Discipline)
    • Important Test (ACT/SAT/GRE/GED) Scores / Dates Taken
  • Employment Information
    • Name of Employer
    • Name of Supervisor
    • Job Title
    • Description of Job Position
    • Address of Employer
    • Dates Employed
    • Name / Address / Contact Information for Potential Recommendations
  • Additional Information
    • Clubs, Organizations, etc. That You Are A Member Of / Dates of Membership
    • Honor’s Awarded 

I’ve drawn up a sample of the Word worksheet I use and uploaded it to Dropbox.  You can find it here.  

While it’s a good idea to have this saved in writing or on your computer, remember that it is all confidential information (and likely the answer to many security questions for online accounts) so don’t share it with other people.  Keep it in a very safe place!

Finally, A Toast To Making Life Easier!

How to Type in Korean on Windows 7

2 Apr

안녕하세요!!

How to Type in Korean on Windows 7


You can enlarge the images by clicking on them

  • Go to your Windows “Start” button on the task bar at the bottom of your screen.

Windows 7


Deactivating Your Pinterest Account

25 Mar
Account Box

Pinterest Account Drop-down Menu Box

Under the new Pinterest format, it’s really easy to deactivate your Pinterest account.

1. Go to the Your Account’s Home Page.

2. Click the drop-down menu on the top right.

3. Click Settings.

4. At the bottom of the Settings Page, you’ll see the “Deactivate My Account” button.

5. Walk through that process, and you’re done! 🙂

Changes to the Pins on the New Pinterest

24 Mar

You can find Changes to the Pinterest Account Tools Here.

This post will run through a few of the new changes established to the Pins themselves.  I actually think this part is a lot more convenient than Pinterest’s old pin format.  The new ones allow you to go straight to the website, see other pins from that site, etc.

The Pin Itself

Pin

A picture of how the Pins now look

The pin itself doesn’t actually look all that different.  It still has the image, and if you click the image it will take you to the linked URL.  Nonetheless, there are a couple changes to note.

1. The greatest change to the pin itself is that you can no longer open it up and edit your own pins here.  The edit button no longer appears unless you are on the Boards or Pins main page on your account. Continue reading